Evatech Australia
  • Gaming PCs
    Custom PCs Intel 15th Gen Ultra AMD Ryzen Zen 5 Pre-Configured PCs Pre-Built PCs Game Database
  • Workstation/Server
    Custom Workstations Intel 15th Gen Ultra AMD Ryzen Zen 5 AMD Threadripper Request a Quote Pre-Configured
  • Home/Office
    Custom PCs Intel 15th Gen Ultra AMD Ryzen Zen 5 Pre-Configured Pre-Built PCs
  • Peripherals
    Cables Controllers Headsets & Microphones Keyboards Mice Monitors Speakers New Products All
  • Components
    Cases CPUs Cooling Graphics Cards Motherboards PSUs RAM Software Storage New Products All
  • More
    Contact Us News / Blog About Evatech FAQs Help Docs Visit The Store Warranty Zip 6 Months Interest Free^ Lay-by Terms of Service
Gaming PCs
Custom PCs Pre-Built & Ready-to-Go Game Database
Home & Office
Custom PCs Pre-Built & Ready-to-Go
Workstation & Server
Custom Workstations Request a Quote
Peripherals
Keyboards Mice Monitors Headsets All
Components
CPUs GPUs All
More
Contact Us About Evatech FAQs Help Docs Visit the Store Terms of Service
Login or Register
Cart My Account Search
Evatech › Help Docs › Maintenance

Categories

AudioCPUGeneralGraphics CardMaintenanceMonitorRAM (Memory)SustainabilityUse Cases

About Evatech

Since 2013, Evatech Computers, a fully Australian-owned and operated company, has provided custom-built gaming, workstation, and home + office PCs, meticulously tailored to individual client needs and budgets.

Shop

Custom Gaming PCs
Custom Workstations
Pre-built PCs
Monitors
Mice
Keyboards
Headsets & Microphones

Maintenance

Initialising new storage drives

Published 11th Aug 2022, updated 19th May 2023 ·
2 minute read
Table of Contents
Initialising a new drive

If you've just added a new storage drive to your PC and it isn't showing up in File Explorer (but is showing up in Device Manager's Disk drives section) then you may need to initialise it and add a drive letter before you can use it. Thankfully this final step is relatively easy.

Initialising a new drive

  1. Open Disk Management by opening your start menu and typing in Disk Management (may be referred to as Create and format hard disk partitions)
  2. If you're prompted by the Initialize Disk popup window on top of Disk Management like in the image below, ensure that the GPT option is selected and then click OK.
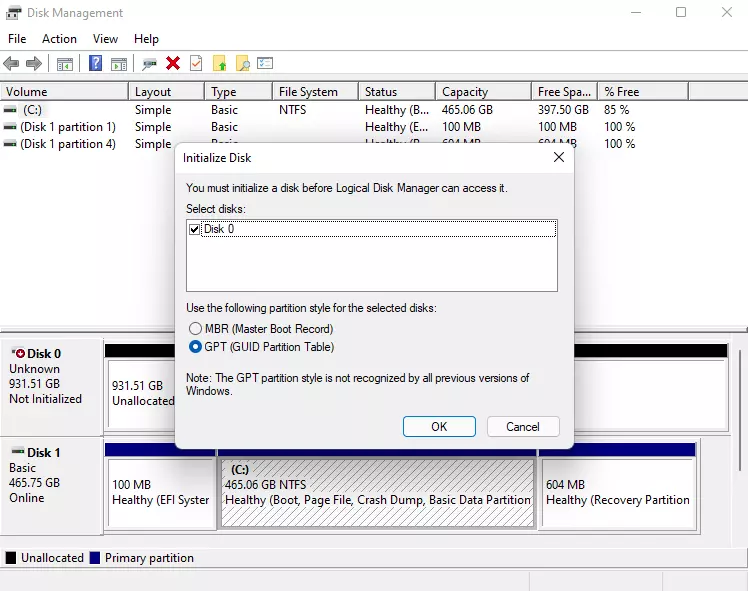
    Alternatively, if you don't get the Initialize Disk popup, you can right click on the "Unknown" disk and click the option to Initialize Disk
  3. Then right click on the white space below the black bar and choose the New Simple Volume... option, as shown in the image below
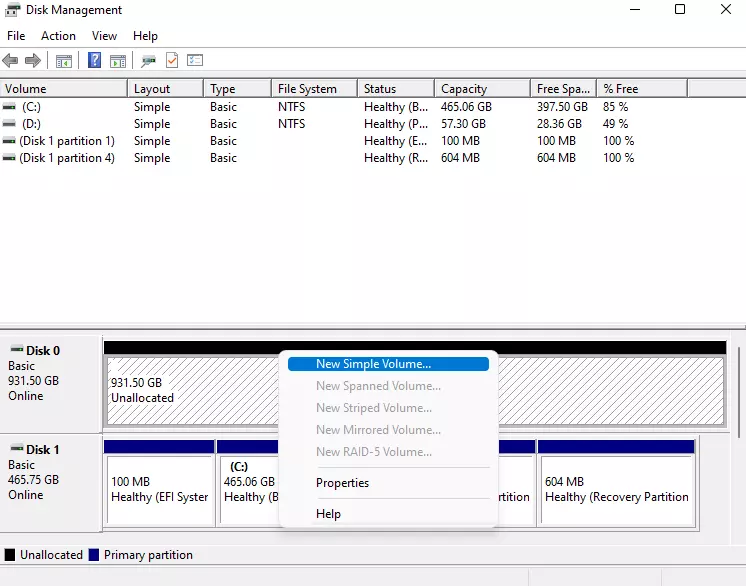
  4. The wizard will guide you through the last bit of the process, for the most part you'll want to click Next to proceed through the steps, the default values are to use the maximum amount of space for the partition (recommended). One of the steps allows you to customise which drive letter is assigned and you can also name the drive, but these can be changed later.
  5. Keep the Disk Management window open until you ensure you can view the new drive in File Explorer, then you're done!
Need help with your Evatech PC?

Something still not right with your Evatech PC? We’re standing by and our support team can assist you!

Contact Evatech Support
There’s more help docs!

If this page didn’t solve your problem, there’s many more to view, and they’re all very informative.

Browse Help Docs
Terms of Servicehours
Visit the Storephone
Contact Uscopyright
Help Docshelp
Newslocation
visa mastercard
commonwealth westpac
zipmoney
klarna
lab-by
location6 Mediterranean Circuit, 3173 VIC
hoursMonday - Friday 10am-6pm
phone+61 (03) 9020 7017
abnABN 83162049596
copyrightEvatech Pty Ltd
Proudly serving Melbourne | Sydney | Adelaide | Brisbane | Canberra | Hobart
Latest headlines: MSI's RTX 5090 Lightning Z! (Sold out) | Munich Workstation PC | Phanteks Enthoo Pro 2 Server | Wraith Gaming PC | Corsair Air 5400 LX-R Link | Wraith Gaming PC | Hyte Y70 Touch Red | More Short Form Articles
Trademarks and brands are the property of their respective owners. All prices are in AUD and include GST.
SITE MAP