Motherboard Debug Lights
If your PC isn't starting up as expected, your motherboard might be able to point you in the right direction to correct the issue.
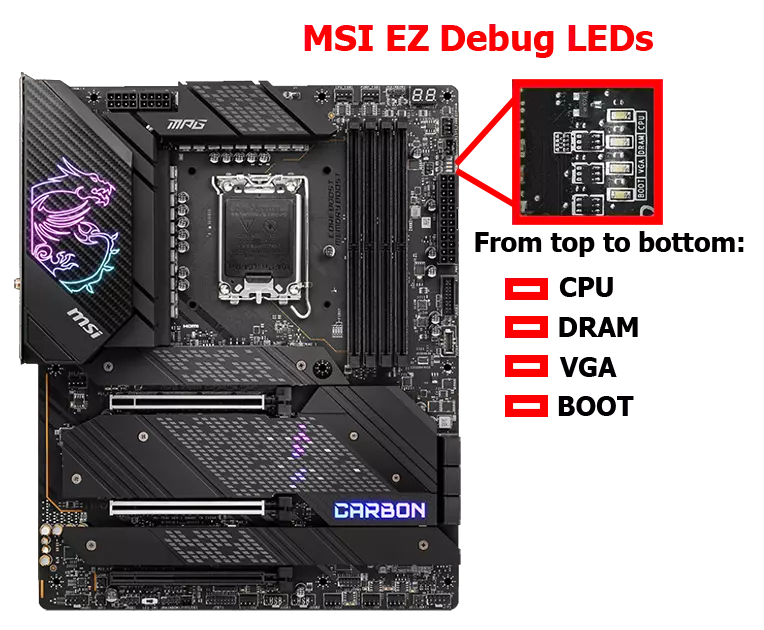
Many motherboards, such as MSI motherboards (which is predominantly what we use here at Evatech) have EZ Debug LED lights on the motherboard, and they are key indicators of the status of key components of your computer during the booting process. When there is an error in the boot process the corresponding LED stays lit until the problem is resolved, or it may flash/cycle between LEDs, but more on that below!
The debug LEDs are usually towards the top right of the motherboard, above the large power cable plugged into the motherboard (ATX power), as indicated in the image below.
 Typically, when a debug light has come on, it's for the component in question, for example:
- CPU - CPU is not detected/properly installed or has failed
- DRAM - RAM is not detected/properly installed or has failed
- VGA - GPU is not detected/properly installed or has failed
- BOOT - bootable storage drive not detected or has failed
But, we can provide a bit more insight which may help you out. It can be helpful to read this whole document and try the troubleshooting outlined even if the LED isn't the same - double checking these things can be part of the solution.
[WARNING] Before handling any internal components of your PC, ensure the PC is completely shutdown & disconnected from wall power.
NEVER open the power supply unit at any time as capacitors may still be holding hazardous levels of charge long after the cable is disconnected.
NEVER attempt to handle internal components while the PC is running.
Laying the PC down on its side is often the easiest way to work within a PC rather than leaving it standing where it may topple over.
CPU
When the CPU LED indicator is lit up one of the first things you want to do is check to make sure the PSU CPU power connectors are properly plugged into the motherboard. If after that the CPU indicator light is still on there are a few other steps you can try.
- Try restarting the PC a few times
- Remove and re-seat RAM
Other common suggestions are to ensure that the CPU itself is correctly installed, but if you had your PC built by us, there's practically no chance of this being the issue as we would firstly install it correctly, and secondly we also test the system for numerous hours afterwards, so would figure it out pretty quickly even if we had installed it wrong.
If after trying those steps the CPU LED indicator is not going away, then it could be a sign that your CPU or motherboard has developed a fault and needs to be replaced.
DRAM
When the DRAM Indicator light has lit up it generally means that there is an issue with the RAM. The first step to solving the issue is to confirm that the memory is fully seated, and if it is not to try removing the RAM and re-seating it, and if you have multiple sticks of RAM, you can take some out and try to turn your computer on with just one of the RAM sticks installed (covered here).
VGA
When the VGA LED indicator is lit up it usually means the graphics card has run into an issue. The first step to resolve the issue is to make sure the PSU PCIe connectors plugged into the graphics card are fully plugged in, and then try to turn the PC back on.
The second step is to remove the graphics card and try to reinstall it. With the graphics card out, if your PC has the ability to display graphics via the CPU/motherboard, you can try running the PC without the graphics card, just temporarily.
If the above steps have not solved your issue and if you have the option available you can try an alternative compatible graphics card to see if that resolves your issue, and if it does it likely means you have a faulty graphics card.
BOOT
The boot debug LED refers to the storage device from your PC. Depending on what type of storage drive you're using, you will want to check if they are connected to the motherboard properly. Once you have turned your PC off you can make sure that the SATA data cables and SATA power cables are installed correctly at both ends. For M.2 drives you can remove them and reinstall them if you want to rule out an inproper connection.
In extremely rare cases, the SATA data cable could be faulty, so replacing that is worth a try if you're really left scratching your head.
If after trying the above you still have issues with the boot LED, then you can try to turn your computer on with all your storage drives disconnected, once you have tried turning you PC on without any drives plugged in and you are able to make it to a BIOS screen then it would seem that (at least one of) your storage drive(s) was preventing the computer from booting.
Flashing/Cycling between LEDs
There are times when the LEDs may appear to flash or repeat the same cycle over and over. As you may or may not have noticed, even when your PC is functioning normally, the Debug LEDs get lit up as the boot process plays out (in the order of the lights), if it repeatedly cycles through the process but stops at one before starting again, usually the one that it stops at is the problem area and needs attention.
One other thing that may work is to turn the PC off, unplug the power cable from the PC (the PSU switch needs to remain in the ON position), and then press the PC's power button 5-10 times. The PC will not turn on, as we'd expect since the power cable isn't connected, but this is intentional. Leave the PC in this state for at least an hour - after this, return to the PC and plug in the power cable again, then try to power it on as normal.
Different Debug LED arrangements
Non-MSI boards, or even some higher-end MSI boards may have an alternate take on debug LEDs. Low-end non-MSI boards may not have any debug LEDs, and this leaves you guessing a bit more than any other solution, but high-end boards may have a digital display for debugging purposes, and the codes and their meanings will be outlined in the motherboard manual, which you can either find in the physical format if available, or can be downloaded via the manufacturer's website for the motherboard model in question.
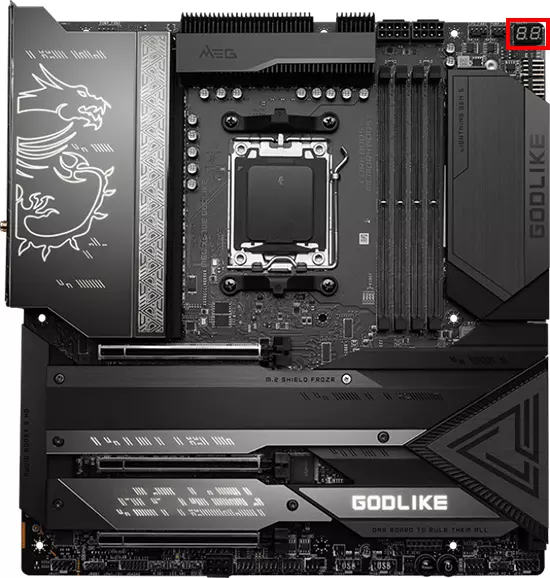
If you wanted another example of the digital display to look out for, it's actually in the first image on this page, above and to the right of the RAM slots! A quick note, when the PC is booted, it's no longer an error code that's shown on the display, often it's the CPU temperature or something along those lines.


 6 Mediterranean Circuit, 3173 VIC
 Monday - Friday 10am-6pm
 +61 (03) 9020 7017
 ABN 83162049596
 Evatech Pty Ltd